• Home
  • About
  • Shop
  • Advertise
facebook twitter instagram pinterest bloglovin Email

Ramblings with Rin


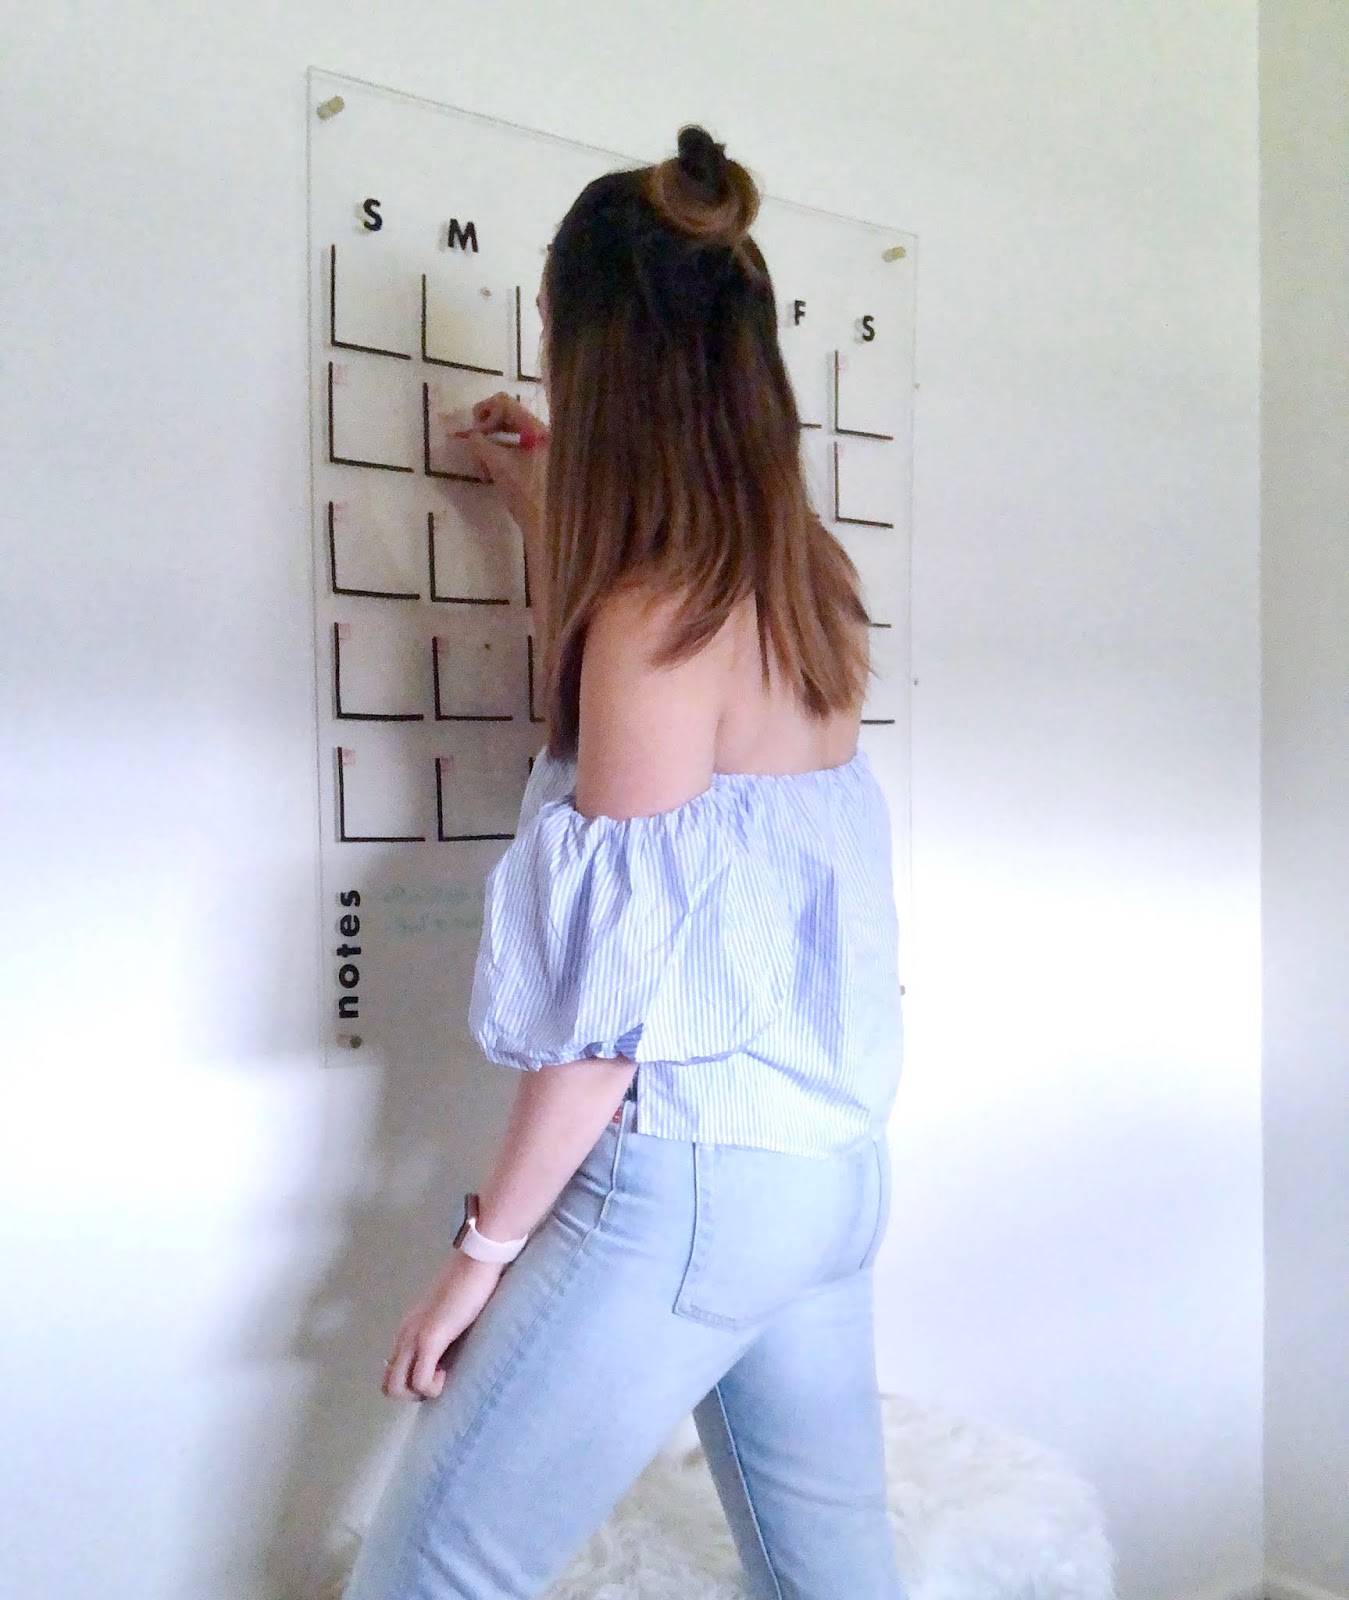
I'm SUPER excited for today's DIY because it is one that's been on my list for a long time. I've had my eye on an oversized clear acrylic calendar for quite some time but could not justify spending $300+ on a cool looking calendar. Since then, I've been sourcing out materials and a plan of attack for making my own DIY Acrylic Calendar. 

I used this A Beautiful Mess tutorial as my starting point and tweak a little based on what I had available. Also, if you aren't a big fan of DIY projects like me but also don't want to pay an arm and a leg for your own, I've got your back. This alternative from Hobby Lobby is just a tad smaller than this but only $60 (but look for coupons before you buy)!


What You Need:
  • 30" x 36" x .220" Acrylic Sheet 
  • Electrical Tape 
  • Scrapbook Letters 
  • Brass Standoffs 


Step One: The first step is drilling the holes in each corner of your sheet. I did mine an inch out from the edge and it was perfect. I followed the tip from the A Beautiful Mess version and used a 1/4" drill bit and drilled in reverse while applying pressure. I did find out after the fact that I need to make the holes bigger to fit the stand offs I linked above. 


Step Two: Cut and layout the vinyl calendar. TBH, this was the most tedious and annoying part for me because I didn't have the luxury of having a custom vinyl maker, so I add libbed by using electrical tape. My calendar squares are approximately 3.5 x 3.5 inches, so I would measure a piece of electrical tape 3.5" long. I would the place the electrical tape on a cutting mat and then using a box cutter, I would cut four evenly spaced stripes. This was the fastest and easiest way I could think to cut these and was able to get in a good groove like this. 

Important note: You will need 70 stripes to complete the square section, and I left approximately 3/4" between squares. 

Step Three: I used the scrapbook letters to create the days of the week and notes section.  

Step Four: Finally, it is time to hang your new calendar. Every standoff kit is different so be sure to follow the instructions on yours to get the best results! 

Now, you can decorate and and starting scheduling your life with dry erase markers in fun colors!


Share
Tweet
Pin
Share
No comments

DIY Pom Pom Earrings

Buckle up, ladies, because I have a fun AND super easy DIY for y'all. I've had my eyes on this projects for quiet some time after seeing this adorable pair from Baublebar. 

Here's the deal; you only need two things and no tools are required. Waiting for the catch? There isn't one. It took under five minutes to make and they are so cute! 

You only need pom poms (I bought mine in a multi pack at Target) and gold hoop earrings (these are from Forever 21). Just poke the pom pom through the hoop and THAT'S IT! 

Told you it was super easy. If you make this DIY for yourself, tag me in the final product over on Instagram (@rinlongo). 
Share
Tweet
Pin
Share
No comments

If there is one thing that will always be true about me, I love a good DIY project. It has been almost a full year since I purchased my first home (crazy!), but I am still finding myself in constant home renovations. While I was looking for home inspo on Pinterest, I found this killer neon light/wallpaper combo. I thought it would be perfect for my home office and set out to find an affordable way to make it myself. 


WHAT YOU'LL NEED:

  • EL Wire (I used 9 ft)
  • Chalk 
  • Drill
  • Wood or Drywall Sheet 
  • Shower Curtain (or fabric)
  • Hot Glue or Super Glue 

The best part of this DIY is it is SO CHEAP. And coming from the queen of cheapskates this was very necessary. If you've never heard of EL wire, it is this brilliant battery powered wire that is easy to form and can be secured simply by glueing it in place. There are a lot of different ways to go about making this. I married two DIY's I watched into one. I'm not going to lie this is not super easy, but it is also not incredibly difficult; it just takes a great deal of patience (which I can sometimes lack). 

First, cut your drywall sheet (or wood sheet) down to the size you want (mine is roughly 15"x25"). You will then need to cute your fabric down to the right size; leave about two inches on each side. You can secure it by stapling in the back. 

Next, you'll trace the word or phrase you want onto the fabric. I free-handed this part; but, you are welcome to use a specific font if you wish. 


The next part is the hardest part to put into words, and to be quite honest, it depends a great deal on the word or phrase you will be creating. You will need to create an entry point using a drill (mine started at the base of the first "r" in ramblings. Weave the EL wire all the way through that hole and secure the battery pack in the back. Then form each letter using the EL wire securing as you go. I used hot glue; however, I recommend the super glue route to avoid the "strings" hot glue creates. Along the way, you will have to create more entry points but you'll know when to do that. The 9ft was just enough for my phrase so you may need to purchase more. 

And that's it! I will definitely saw it is better to start with a simply word before jumping in to the full phrase. That way, you can get the hang of it. If you end up making this on your own, tag my on Instagram @rinlongo, so I can see the creations you make. 
Share
Tweet
Pin
Share
No comments


What better way to snap my blogging drought than with a fun (and colorful) DIY. I am a sucker for a simple and easy to execute projects; especially when is involves pink paint! I've had my eyes on some pink letter boards for awhile now, but could never get over how damn expensive they were. This is when the DIYer in me takes over. 

This project is so easy; you only need four things (five if you want white letters like me) to accomplish it.

- White letter board (found mine for $10 here)
- Acrylic paint in the color of your choosing 
- Textile medium 
- Paintbrush 
- White spray paint (optional)

In a disposable cup, mix together your acrylic paint and textile medium. This allows the paint to be easier to work with and last longer. Next, using a larger paint brush, paint on the felt board with the mixture. Allow to dry and ta da, you are done! I preferred to have white letters, so I spray painted mine white. This step isn't necessary but equally as easy. 

Share
Tweet
Pin
Share
No comments


I've been dying to try this DIY for quite awhile now, and it is so simple; I don't know why it took me so long to test it out. The best part? You can try this out with any style of shoe! See below for the full deets.


What You Need: 

- Yarn 
- Shoes (I snagged mine at Goodwill)
- Hot glue gun

Using your fingers, create your desired size pom pom. I created a medium sized pom pom. Small tip, if you create a larger pom pom you can trim it down so it looks more compact once you reach your desired size. Once you've created your pom poms (I made six), you will heat a hot glue gun to help attach them to your shoe. And voila! That is it. Doesn't get much easier than that! 


Share
Tweet
Pin
Share
1 comments

Longtime followers of this blog know that there are two things that I love in life: Goodwill and a DIY project, and when I can combine the two together, life just clicks. I scored this Calvin Klein denim skirt at 50% off day for a mere $3.00 and smelled the perfect DIY project. 

In it's original form, this skirt was long and boring. I have been inspired frayed denim for awhile and felt that this skirt would be the perfect opportunity to try it out. I watched this tutorial and got straight to work. Fair warning, this is a long process, but the final product is well worth it! 

Share
Tweet
Pin
Share
6 comments

Earlier this year, I had put an offer in on a place that I thought would be my new home. I was over the moon, beyond excited, but unfortunately, it didn't work out. After my offer had been accepted, I headed straight to Pinterest and started searching for home decor pins to inspire my soon-to-be home. One of the pins I discover was this DIY Ikea hack, and I fell in love instantly! 

The best part of this hack is it won't cost you more than $30 dollars! For the full DIY, you can visit the Kitchy Kitchen, but you can get started by purchasing: 

- Marius Stool from Ikea ($4.99) 
- Gold Spray Paint ($6.99)
- Safetey Pins 
- TENJN Rug from Ikea ($14.99)

Share
Tweet
Pin
Share
No comments


This is the easiest (and not to mention the cheapest) DIY I have ever done. All you need to do is pick up a beanie at the dollar store and some yarn and follow along! 

To make the pom pom, follow this tutorial using toilet paper rolls. It's simple and helps to get that oversized look we are going for. Once your pom pom is complete, you will sew it to the top of your beanie and BOOM done. 


Like I said, the easiest DIY for the perfect pom pom beanie! 
Share
Tweet
Pin
Share
1 comments

I'm not usually one to plan a whole outfit around a holiday (even Halloween), but for some reason this 4th of July had me itching to get decked out head-to-toe in patriotic themed threads! You might remember on Memorial Day I posted this shopping guide. I mentioned that I was DIY'ing my own pair of American Flag shorts. Well, here is the final product! 

These were super easy to recreate! I started with a pair of Wrangler Jeans from Goodwill and after taking a pair of scissors to them and fraying the edges, they were transformed into cutoffs! Joann provided the patriotic fabric, which I sewed to the front and voila! A pair of patriotic shorts for $10 (as opposed to $60)!


Share
Tweet
Pin
Share
No comments

Like I said on Friday's Currently Craving post, I have been on the hunt for the perfect pair of distressed boyfriend style shorts. The DIY'er in me decided to make my own pair using a pair of Levis jeans I purchased at Goodwill for $8! This is my first time distressing denim and I am by no means an expert! Stay tuned for tomorrow's outfit post to see them in action! 


First step is to cut your jeans. In my opinion, this is the hardest part because you have to make sure you don't cut off too much. Always cut your shorts longer than you really want because you can always cut more. I wanted to roll the bottom of my shorts, so I cut mine a 1/2" longer. 


Ta da! Now time for distressing! Get ready for an arm workout!


I used a combination of a steak knife and exacto knife. Honestly it was just trial and error. I didn't want to over-distress them because the washer will help me with that as will wear and tear.  


In a horizontal motion, run your knife along the denim. Don't press too hard! Also, make sure to stick something in the pant leg so you don't cut through to the other side. 


Here is my final product! A nice pair of denim shorts to wear for the summer! If you try this DIY out, I would love to see how your's turn out! Post them on Ramblings with Rin's Facebook Page or tweet me with the hashtag #ramblingswithrinDIY
Share
Tweet
Pin
Share
No comments

As stated on last week's Currently Craving post, I'm a big fan of the messy low bun. Just a disclaimer: this is my version on messy. Some people prefer to tease the top layer of hair; I, however, do not.

1.) Start with texturized hair. I create loose beachy waves by using a 3/4" Conair Curling Iron. The waves don't need to be perfect, so don't focus on that too much!

2.) Add some volume to your hair by using a dry shampoo or volumizer product. I'm using the Aveeno dry shampoo (also seen on last week's currently craving). 

3.) Brush/ work in dry shampoo

4.) Pull hair into a low ponytail. Make sure your ears are covered. 

5.) Twist hair and shake to loosen. 

6.) Wrap hair into a bun and secure with hair tie. Again, you are wanting a messy look so don't try and make the bun perfect!

7.) Pull a few pieces of hair from the side and pull at the top of your hair to loosen.

8.) Using a 3/4" curling iron curl the pieces that you pulled from the side!

It's as easy as that. Sometimes I tuck the side pieces behind my hair for a messier look, but that is optional! 
Share
Tweet
Pin
Share
No comments
1. // 2. // 3. // 4. // 5.

I've never been one to get behind egg decorating especially when I was younger. That was mostly due to the fact that I hate eggs, so I didn't see the point in making them! However, all these easter decorating DIY's have changed my outlook on the process. Glitter, gold foil, ombre eggs, and even eggs full of confetti are just a few of my favorite ones to try for Sunday! 
Share
Tweet
Pin
Share
No comments
I recently stumbled upon this DIY Lips Stain on The Beauty Department, and instantly ran to my cupbard to find some Kool-aid. I tested it out on my roommate and loved it! The idea of using my favorite childhood drink to create a lip stain was so intriguing, and not to mention it's easy and cheap

Some things to note: 
The powder can sting your lips, and it does not taste very well. For this to look the best, your lips must be in good condition. Try mixing it slightly with vaseline to achieve more of a "gloss" look.

 Start with bare lips
 Select a flavor/ color (I used tropical punch for a nice deep red). Wet your finger and place in the dry powder.
 Rub powder onto lips
 Let sit and avoid licking (trust me it does not taste very good)
 Dampen a Q-tip to remove the clumps. 
(This part can take some patience to remove all the clumps)
Voila! A nice tinted red lip! 

**If you have any tips to perfect this DIY lip stain I would love for you to share!
Share
Tweet
Pin
Share
1 comments
I am always on the hunt for different manicures that I can try out. This morning I was in my kitchen grabbing something and I notice the container of tinfoil, and all of the sudden I felt inspired to do a tin foil manicure! Let me know what you guys think.

 What You Need:
-Foil
-Clear polish
-Scissors

 Paint a coat of clear polish on your nail. Let sit for a couple of seconds and then place foil on top of nail. Press down on the foil making sure it adheres to the whole nail. 
 Leave the foil for about 30 seconds, and then use a small pair of scissors to trim around the edges.
Repeat for all nails, and voila! An edgy, cheap manicure

**Take note: This is not a fast manicure. It takes patience but is worth it!
Share
Tweet
Pin
Share
No comments
 I have been wanting to try out this DIY for awhile to pair with my blackboard painted bar area! This is one of the simplest DIY's I have ever done. 

What you need:
- Bar Stool
- Spray Paint or Paint
-Sandpaper

Tape off the section of the barstool you want to paint and then sandpaper it (this makes it easier for the paint to adhere). Next you will carefully spray paint or paint the section you taped off and let dry before adding a second coat. After the last coat dries, pull off the tape and voila! Easy, neon bar stools!

Share
Tweet
Pin
Share
1 comments
It's Wednesday! Which means time for some weekly DIY inspiration! Bloggers across the web have been adding baseball caps to their ensembles, and I have been loving the tomboy accent! I saw this embellished cap and was completely inspired!


What You Need:
-Baseball Cap {Michaels}
-Studs {I used iron ons}


Layout the studs along the hat to see what looks good for you!


Once you have those places, take your iron (on cotton setting) and press down on studs. Hold for five seconds. 


Repeat that process until you are pleased with the look of the hat!


And Voila! Easy and cheap studded baseball cap!
Tweet
Share
Tweet
Pin
Share
1 comments

It's Wednesday, which means we are all battling to make it through the rest of the week. I thought my readers could use a little DIY inspiration to get them through the rest of the week! I've been wanting to make these bracelets for awhile, and made two different versions! Hope you enjoy!

 What You Need:
- Chain
-Geodes (I bought mine at Michaels)
-Lanyard String
- Split Rings


 For the pink band bracelet, you will be doing a circle lanyard stitch. Starting this stitch is the hardest part but here is the best tutorial


The Stitch itself is easy and very similar to the square knot. Instead of bringing the strands straight over, you will be bringing them diagonally over, and then weaving the other strands. The tutorial above helps illustrates this if there is confusion.


Continue the stitch until the length is good enough to fit around (and over) your wrist. 


To finish the bracelet, do one more stitch around the split ring and then tie off the loose ends and cut them. 


This is another variation of the bracelet using gold chain, and it is a lot fast and easier! Attach one end of the gold chain on the split ring. Measure around your wrist and place the other end of the chain on the other end of the split ring. 


Like so!


Here they are! Perfect bracelets for summer time!
Tweet
Share
Tweet
Pin
Share
1 comments
Older Posts

About me

About Me

Hi there! My name is Rin, and I'm the face of Ramblings with Rin: a fashion and lifestyle blog for the budget conscious. With every post, I hope to provide tips and guidance to achieve great personal style on a budget. Thanks for following along!


Follow Along

  • facebook
  • twitter
  • instagram
  • pinterest
  • bloglovin
  • email

currentlycraving

doityourself

currentlycraving

Created with by ThemeXpose | Distributed by Blogger Templates